最近開始熟悉 Unity SRP 和 shader graph (SRP 還不算熟)
上過課之後
看官方的部落格介紹文章也很快進入狀況
https://blogs.unity3d.com/2019/07/31/custom-lighting-in-shader-graph-expanding-your-graphs-in-2019/?fbclid=IwAR387bG0VVwX7nF0vwRZL_7_Qmf2ZgsoXWhRL0eJnuUfTYZqQQ2XGZjobkk
差不多有感覺可以駕馭 shader graph (至少針對 LWRP)
另外延伸看到有人分享文章
https://medium.com/@larsbertram1/lwrp-and-custom-lighting-in-shader-graph-6a7c48008a1d
====
The shader compiler comes to our rescue, as it will strip all code, it thinks, which will not contribute to the final pixel. So if we set albedo to constant 0,0,0 or black the entire diffuse lighting pass will always result in 0,0,0 and thus the shader compiler will strip it, right? Setting occlusion to 0.0? Ambient diffuse and specular lighting will always be 0.0, so these parts should get stripped as well. What’s about direct specular lighting, which includes the most expensive calculations? Setting smoothness to 0.0 and specular to 0.0 as well should do the trick.
====
使用 Unlit shader 製作 custom lighting shader 無法運用 Unity 內建的 global illumination / lightmap / cascaded shadow 功能, 使用 PBR Master Node 的話又會顧慮到做多餘 PBS lighting 的 shader codes/calculations.
因此將 custom lighting 的結果直接指定給 PBR Master Node 的 Emission input, 其他用不到的 feature 就歸零, 這個方式就可以透過 Unity stripping shader codes 功能將 PBR Master Node 多餘的計算相關 shader codes 排除.
非常有用的資訊.

2017年8月12日 星期六
開發日誌 (-1): 毛(fur shader) - 前置研究
為了自己心目中的遊戲,
已經關注 fur rendering 這個技術領域多年了(但還是只看懂皮毛表面)。
看了數篇的文獻和現成的 example shader codes,
每次看幾乎都沒什麼疑問,
知道那些程式在做什麼或為了什麼效果,
但等到真的想實現自己想做的效果時,
又覺得缺了很多專業知識而會導致做不出來。
目前為止看過讓我覺得最簡單易懂的教學網站應該是這個:
http://www.catalinzima.com/xna/tutorials/fur-rendering/
要表現出毛髮的效果基本上就是一個原則,
同樣的毛髮幾何對象依不同厚度切片層次重畫好多次。
每次重畫某層切片時就依照該層厚度(高度)對應的顏色、疏密度以及透明度,
去表現那層次的毛法外觀效果。
其實我感覺就是一個volume rendering的變化作法。
http://www.catalinzima.com/wp-content/uploads/2008/07/layers.jpg
這種分割成大量切片重畫的方式通常被稱為Shells的畫法,
除此之外可以在幾何邊緣或是貼圖紋理不連續的三角面接續處,
安插額外的類billboard切片,
來補足視覺上的破綻。
此種畫法通常被稱為Fins畫法。
所以很多討論毛髮效果的文獻會不停的提到Shells & Fins這樣的名詞。
https://timothythiecke.wordpress.com/portfolio/hlslshader/
有趣的事情是幾年前我就在github上看過open source Unity fur rendering專案。
但我今年要重找時沒有找到適合的open source project(for Unity),
(其實我只是懶的做debugging和migration)
(沒辦法下班時間也實在是很有限)
最後沒耐心的情況下我甘脆去asset store買了一個fur shader(5 USD),
買下來才發現其實就是當年我看到的github專案上幾乎一模一樣的codes XD
也好如果是同作者的話就當作回饋給他吧。
https://www.assetstore.unity3d.com/en/#!/content/66461
試用了該shader後試作出了下面這樣四不像的動物(一隻老虎 XD)。
看來要做的事還有很多:
1. Density control.
2. Height map control.
3. Transparency control.
4. Geometry modification (controlling via vertex colors).
 看來還缺很多東西才能開始嘗試..
已經關注 fur rendering 這個技術領域多年了(但還是只看懂皮毛表面)。
看了數篇的文獻和現成的 example shader codes,
每次看幾乎都沒什麼疑問,
知道那些程式在做什麼或為了什麼效果,
但等到真的想實現自己想做的效果時,
又覺得缺了很多專業知識而會導致做不出來。
目前為止看過讓我覺得最簡單易懂的教學網站應該是這個:
http://www.catalinzima.com/xna/tutorials/fur-rendering/
要表現出毛髮的效果基本上就是一個原則,
同樣的毛髮幾何對象依不同厚度切片層次重畫好多次。
每次重畫某層切片時就依照該層厚度(高度)對應的顏色、疏密度以及透明度,
去表現那層次的毛法外觀效果。
其實我感覺就是一個volume rendering的變化作法。
http://www.catalinzima.com/wp-content/uploads/2008/07/layers.jpg
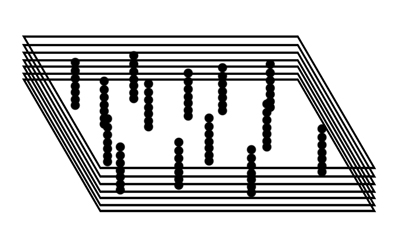
這種分割成大量切片重畫的方式通常被稱為Shells的畫法,
除此之外可以在幾何邊緣或是貼圖紋理不連續的三角面接續處,
安插額外的類billboard切片,
來補足視覺上的破綻。
此種畫法通常被稱為Fins畫法。
所以很多討論毛髮效果的文獻會不停的提到Shells & Fins這樣的名詞。
https://timothythiecke.wordpress.com/portfolio/hlslshader/
有趣的事情是幾年前我就在github上看過open source Unity fur rendering專案。
但我今年要重找時沒有找到適合的open source project(for Unity),
最後沒耐心的情況下我甘脆去asset store買了一個fur shader(5 USD),
買下來才發現其實就是當年我看到的github專案上幾乎一模一樣的codes XD
也好如果是同作者的話就當作回饋給他吧。
https://www.assetstore.unity3d.com/en/#!/content/66461
試用了該shader後試作出了下面這樣四不像的動物(一隻老虎 XD)。
看來要做的事還有很多:
1. Density control.
2. Height map control.
3. Transparency control.
4. Geometry modification (controlling via vertex colors).

2017年5月27日 星期六
lava shader code example
http://irrnetcp.proboards.com/thread/2/lava-shader-hlsl
上一篇有提到當時 Google 大神引導我到一篇超佛心 post,
讓我看到我大腦一直無法解開的 optimized lava shader solution 難題!
就像佛心大大分享一身功夫完全不求回報一樣。
都提到了我就順便就我理解的部份說明一下 lava shader 的運作流程。
但先說明我的數學也很爛,
所以直到現在還是有幾行關鍵的 condition 看不懂 XD
既然是要分享我註解就盡量寫中文好了
不過我是預設讀者看的懂 gpu shader code就是囉。
我所理解的有限,有人發現我寫錯的可以打我臉 XD
當然歡迎有緣佛心大大來教我我也不懂的地方 XD
code snippets (HLSL)
===================================================
float4x4 mWorldViewProj; // World * View * Projection transformation
struct VS_OUTPUT
{
float4 Position : POSITION; // vertex position
float2 TexCoord : TEXCOORD0; // tex coords
};
// vertex shader 沒做任何特別的事情
VS_OUTPUT vertexMain( in float4 vPosition : POSITION,
float2 texCoord : TEXCOORD0 )
{
VS_OUTPUT Output;
// transform position to clip space
Output.Position = mul(vPosition, mWorldViewProj);
Output.TexCoord = texCoord;
return Output;
}
struct PS_OUTPUT
{
float4 RGBColor : COLOR0; // Pixel color
};
float time;
sampler2D tex0;
sampler2D tex1;
PS_OUTPUT pixelMain( float2 TexCoord : TEXCOORD0,
float4 Position : POSITION )
{
PS_OUTPUT Output;
// tex0 是作者準備的noise map, 作者將它視為normal map去應用
float4 noise = tex2D( tex0, TexCoord ); // sample color map
// 計算 2 組UV位移分量, 時間參數在此代入影響
float2 T1 = TexCoord + float2(1.5,-1.5)*time*0.02;
float2 T2 = TexCoord + float2(-0.5,2.0)*time*0.01;
// noise.xyz 分別代表tangent space(我譯為切線空間)中的x, z, y軸分量(xz平面視為水平面)
// T1.xy = noize.xy * 2 + T1.xy; 也就是noise空間的 xz 水平位移量影響T1
T1.x += (noise.x)*2.0;
T1.y += (noise.y)*2.0;
// T2.xy = noize.yz * 2 + T2.xy; 也就是noize空間的 yz 垂直面位移量影響T2
T2.x += (noise.y)*0.2;
T2.y += (noise.z)*0.2;
// 由T1再次對 tex0 (noise map)做fetch, 取得T1擾動影響後alpha結果 (p = noise.a)
float p = tex2D( tex0, T1*2.0).a;
// 以T2由 tex1 (lava炎漿貼圖) 去取得炎漿的原色
float4 col = tex2D( tex1, T2*2.0 );
// 神奇的數學來了, 我頭開始痛惹
// col 被 p * 2 影響後再加上自身 col * col - 0.1, 明顯是一個高亮度曝光的動作
float4 temp = col*(float4(p,p,p,p)*2.0)+(col*col-0.1);
// 這 3 個 if condition 我真的無法解釋 = =, 但最關鍵的就在這辣rrrrr
if(temp.r > 1.0 ) { temp.bg += clamp(temp.r-2.0,0.0,100.0); }
if(temp.g > 1.0 ) { temp.rb += temp.g-1.0; }
if(temp.b > 1.0 ) { temp.rg += temp.b-1.0; }
// Jobs done. QQ
Output.RGBColor = temp;
return Output;
}
===================================================
所以這個 shader 需要準備什麼貼圖呢
tex0 : noise(rgba),雖然我的解釋中提到它被我當成 normal map,但事實上r , g, b, a各 channel 都只準備了各自不同地 4 方連續 Perlin noise pattern,而其中 r, g, b 之後主要去影響的是擾動變形;a 則是炎漿的亮度曝光效果主要影響因子。
tex1 : lava,也需要是 4 方連續的 pattern。
上一篇有提到當時 Google 大神引導我到一篇超佛心 post,
讓我看到我大腦一直無法解開的 optimized lava shader solution 難題!
就像佛心大大分享一身功夫完全不求回報一樣。
都提到了我就順便就我理解的部份說明一下 lava shader 的運作流程。
但先說明我的數學也很爛,
所以直到現在還是有幾行關鍵的 condition 看不懂 XD
既然是要分享我註解就盡量寫中文好了
不過我是預設讀者看的懂 gpu shader code就是囉。
我所理解的有限,有人發現我寫錯的可以打我臉 XD
當然歡迎有緣佛心大大來教我我也不懂的地方 XD
code snippets (HLSL)
===================================================
float4x4 mWorldViewProj; // World * View * Projection transformation
struct VS_OUTPUT
{
float4 Position : POSITION; // vertex position
float2 TexCoord : TEXCOORD0; // tex coords
};
// vertex shader 沒做任何特別的事情
VS_OUTPUT vertexMain( in float4 vPosition : POSITION,
float2 texCoord : TEXCOORD0 )
{
VS_OUTPUT Output;
// transform position to clip space
Output.Position = mul(vPosition, mWorldViewProj);
Output.TexCoord = texCoord;
return Output;
}
struct PS_OUTPUT
{
float4 RGBColor : COLOR0; // Pixel color
};
float time;
sampler2D tex0;
sampler2D tex1;
PS_OUTPUT pixelMain( float2 TexCoord : TEXCOORD0,
float4 Position : POSITION )
{
PS_OUTPUT Output;
// tex0 是作者準備的noise map, 作者將它視為normal map去應用
float4 noise = tex2D( tex0, TexCoord ); // sample color map
// 計算 2 組UV位移分量, 時間參數在此代入影響
float2 T1 = TexCoord + float2(1.5,-1.5)*time*0.02;
float2 T2 = TexCoord + float2(-0.5,2.0)*time*0.01;
// noise.xyz 分別代表tangent space(我譯為切線空間)中的x, z, y軸分量(xz平面視為水平面)
// T1.xy = noize.xy * 2 + T1.xy; 也就是noise空間的 xz 水平位移量影響T1
T1.x += (noise.x)*2.0;
T1.y += (noise.y)*2.0;
// T2.xy = noize.yz * 2 + T2.xy; 也就是noize空間的 yz 垂直面位移量影響T2
T2.x += (noise.y)*0.2;
T2.y += (noise.z)*0.2;
// 由T1再次對 tex0 (noise map)做fetch, 取得T1擾動影響後alpha結果 (p = noise.a)
float p = tex2D( tex0, T1*2.0).a;
// 以T2由 tex1 (lava炎漿貼圖) 去取得炎漿的原色
float4 col = tex2D( tex1, T2*2.0 );
// 神奇的數學來了, 我頭開始痛惹
// col 被 p * 2 影響後再加上自身 col * col - 0.1, 明顯是一個高亮度曝光的動作
float4 temp = col*(float4(p,p,p,p)*2.0)+(col*col-0.1);
// 這 3 個 if condition 我真的無法解釋 = =, 但最關鍵的就在這辣rrrrr
if(temp.r > 1.0 ) { temp.bg += clamp(temp.r-2.0,0.0,100.0); }
if(temp.g > 1.0 ) { temp.rb += temp.g-1.0; }
if(temp.b > 1.0 ) { temp.rg += temp.b-1.0; }
// Jobs done. QQ
Output.RGBColor = temp;
return Output;
}
===================================================
所以這個 shader 需要準備什麼貼圖呢
tex0 : noise(rgba),雖然我的解釋中提到它被我當成 normal map,但事實上r , g, b, a各 channel 都只準備了各自不同地 4 方連續 Perlin noise pattern,而其中 r, g, b 之後主要去影響的是擾動變形;a 則是炎漿的亮度曝光效果主要影響因子。
tex1 : lava,也需要是 4 方連續的 pattern。
2017年2月20日 星期一
舊筆記
這週在整理 unity 筆記時,
突然回想起以前 (2012年) 也有段時間心血來潮,
整理過一些筆記,
然後就急著拿給比我更資淺的同事分享,
那時一開始還一頭熱地想帶他們看 XD.
結果只整理了兩篇就發現花自己太多時間,
後來一忙起來就懶得再做了,
然後筆記這件事就此被我遺忘 XD
現在看到覺得很好笑.
剛好最近在使用 slideshare.
就一起上傳到 slideshare 上留個紀念吧.
當時也只做了兩個單元就停了.
從 computer graphics 的角度去談背後的線性代數相關知識.
筆記主要來源也都以參考網路上(wiki)為主.
所以只有矩陣介紹
以及簡單的轉換矩陣介紹
突然回想起以前 (2012年) 也有段時間心血來潮,
整理過一些筆記,
然後就急著拿給比我更資淺的同事分享,
那時一開始還一頭熱地想帶他們看 XD.
結果只整理了兩篇就發現花自己太多時間,
後來一忙起來就懶得再做了,
然後筆記這件事就此被我遺忘 XD
現在看到覺得很好笑.
剛好最近在使用 slideshare.
就一起上傳到 slideshare 上留個紀念吧.
當時也只做了兩個單元就停了.
從 computer graphics 的角度去談背後的線性代數相關知識.
筆記主要來源也都以參考網路上(wiki)為主.
所以只有矩陣介紹
矩陣 基本說明 from River Wang
以及簡單的轉換矩陣介紹
矩陣 轉換 from River Wang
訂閱:
文章 (Atom)